


HOW TO FLASH FIRMWARE USING ODIN3 FLASHING TOOLS ON SAMSUNG MOBILE DEVICES

Many Samsung user don’t know how to installation firmware for her smartphone, i think this is something that needs to be known by every user, if at one day their phones there was a problem, such as could not get into the Home screen / Boot loop, stuck on logo, can not return to the factory mode or even damaged partition so that the phone they have hardbrick. As in my experience in 2008 of still using Samsung Galaxy Young S5360, at that time I was profoundly ignorant about the android, or can call blind or newbie. I just resigned to Samsung service center, but because of the warranty period is over, Samsung SC gives a fairly expensive repair rates up to 1/4 of the new price of my phone. hmmmm depressing. and i intention undo and try to find solutions through internet. turns out it seems so easy, It did not take long my android phone alive again 🙂
Well, turned away from my experiences, I hope here we all can be a Own Android Service Center. Follow the step-by-step guide below to get started!
How To Flash Firmware Using ODIN3 Flashing tools on Samsung Mobile devices
Disclaimer :
This guide for educational purpose only, I am not responsible if your device increasingly problematic after following this tutorial. (Do With Your Own Risk )
This guide for educational purpose only, I am not responsible if your device increasingly problematic after following this tutorial. (Do With Your Own Risk )
folow this -> link guides <- If you have problem at network like No signal, Invalid Imei, Unknown baseband
FIRST: Flash Samsung Firmware Using Odin3 Flash tools
Prepare :
- PC/Laptop/Notebook with Window OS
- USB data cable
- Download Your Original Stock Rom ? usually, consists of a PDA, AP, Modem, Phone, CP, BL, Bootloader, and CSC file depends on the type of your samsung.
- Download Samsung USB Driver.zip ? Usb driver for all Samsung device, if you already installed KIES on your computer than this download can be ignore.
- Download Odin3 Latest version the Samsung Android Flashing tools? this is a latest version of Odin3 tool flasher for update firmware your Samsung devices
Installation Guides:
- Install Samsung USB Driver on your computer and make sure it completely work.
- Run Odin3.exe, and leave it open on your desktop.
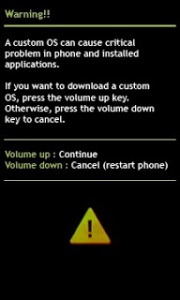
- Now turn off your device, after completely turn off press and hold Volume Down + Home + Power button until you can see Warning Sign. see simulations below….

- On Download Mode windows press Volume Up and then connect your device to computer.
- If Samsung USB Driver already install right on your computer then Odin3 will recognize your device as another COM Port.
- Next, check the “Auto Reboot” and “F. Reset Time” options in Odin Tool. Note : DO NOT PUT .PIT FILE AND DO NOT, I REPEAT, DO NOT TICK REPARTITION.
- If your ROM is a single .tar.md5 package click on the AP/PDA button and browse to the .tar or .tar.md5 file that you extracted in step 1 and select it.
- If the package has more than one .tar archive then they will be labelled with PDA/Code, Phone/Modem and CSC. Just put them in the corresponding section of Odin like below
BL = Bootloader
AP = PDA (CODE) = HOME = Recovery, System, Boot, auto-root and more.
CP = PHONE (MODEM)
CSC = CSC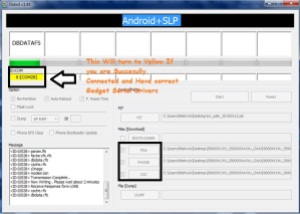
- Finally press the start button to begin flashing the firmware update on your device.

- Done, now you can disconnect your device.
[SECOND} Flash TWRP Recovery Using Odin3 Flash tools
Prepare :
- PC/Laptop/Notebook (Window OS)
- USB Data Cable
- Download and Install Samsung USB Driver for Mobile phones on PC/Notebook/Laptop (Window OS), if you already installed KIES on your computer than this download can be ignore.
- Download and install Odin3 Samsung Flashing Tool on PC/Notebook/Laptop (Window OS)
- Download TWRP recovery.tar for Samsung device ->HERE<-, the file must match the model number on your samsung e.g: SM-XXXX or GT-XXXX, You can see at Settings -> about phones or behind the battery, Note: The TWRP recovery file must end .tar and not .img this file need coverter first to .tar
Installation Guides:
- Download all required files to your computer, meanwhile enable the enable the USB Debugging on your device ↦ go to Settings ↦ Developer Options ↦ enable the USB Debugging options ( If you cannot see the Developer Options then go to About Phone and then tap 7x on Build Number)
- at Developer options -> enable OEM unlock . If you do not have such an item, you have to wait 7 days and it should appear.
- Install Samsung USB Driver on your computer and make sure it completely work.
- Extract, install and Run Odin3 , and leave it open on your desktop.
- Now turn off your device, Then press simultaneously button “POWER+VOLUME DOWN+HOME” to open Odin Download Mode, see image below…
- at Download Mode, press Volume Up then connect your device to computer.

- If Samsung USB Driver already install right on your computer then Odin3 will recognize your device as another COM Port.
- Now press the AP or PDA button, select on TWRP (For Your Samsung Devices Model) recovery.tar and then press Start button below, process usually take 20-30 seconds to finish and will be mark with GREEN PASS message on the odin

- If Done, means TWRP recovery has been installed on your samsung devices.
[THIRD} Rooting Samsung Variant model Using TWRP Recovery
- Turn of your devices
- Go into recovery mode by pressing simultaneously Volume Up + Home + Power button
- at TWRP recovery mode, select Install zip, and then install SuperSU.zip ( NO WIPE ) -> download Latest SuperSU.zip here
- Rooting Dones.
[FOURTH} Rooting Samsung Variant model Using ODIN3 Flash Tools
Installation Guides:
- Download CF-Auto-XXXX-SM-XXXX.zip for your device model and extrack, the file must be .tar or .tar.md5 to flash with odin and save at Computer
- Meanwhile enable the enable the USB Debugging on your device ↦ go to Settings ↦ Developer Options ↦ enable the USB Debugging options ( If you cannot see the Developer Options then go to About Phone and then tap 7x on Build Number)
- at Developer options -> enable OEM unlock . If you do not have such an item, you have to wait 7 days and it should appear.
- Install Samsung USB Driver on your computer and make sure it completely work.
- Extract, install and Run Odin3 , and leave it open on your desktop.
- Now turn off your device, Then press simultaneously button “POWER+VOLUME DOWN+HOME” to open Odin Download Mode, see image below…
- at Download Mode, press Volume Up then connect your device to computer.
- If Samsung USB Driver already install right on your computer then Odin3 will recognize your device as another COM Port.
- Now press the AP or PDA button, select CF-Auto-XXXX-SM-XXXX.tar.md5 and then press Start button. See image below, process usually take 20-30 seconds to finish and will be mark with GREEN PASS message on the odin
- If Done, Samsung devices has been rooted.


0 Comments